Sponsors
- Check out this insightful book on building CLI applications with C# and .NET. A must-read for any developer looking to master the craft!
Observability is no longer a luxury, it’s a must-have. And while logs and traces are essential, custom metrics are where real insight lives.
In this blog post, I’ll show you how to create custom metrics in .NET using OpenTelemetry and visualize them with the powerful .NET Aspire Dashboard. Whether you’re monitoring background jobs, queue lengths, or API performance, having tailored metrics helps you catch problems before your users do.
Ready to level up your observability game in a clean, scalable way? Let’s dive in.
Why You Should Create Custom Metrics
Out-of-the-box metrics are helpful, but they only tell part of the story. If you want to understand what really matters to your application, custom metrics are the way to go.
Here’s why:
You can track domain-specific behavior, like the number of emails sent, orders processed, or background jobs retried.
You get visibility over business-critical flows, not just infrastructure-level health.
They help you define SLOs and alerts based on your reality, not just CPU and memory.
Custom metrics bridge the gap between technical monitoring and business observability. They empower both developers and architects to make data-driven decisions.
How to Create Custom Metrics Using OpenTelemetry in .NET
Creating custom metrics in .NET with OpenTelemetry is easier than you think, and incredibly powerful when combined with the .NET Aspire Dashboard.
Let’s break it down:
1. Configure OpenTelemetry in your Program.cs
Start by registering the services and defining the meters and counters:
				builder.Services.AddOpenTelemetry()
    .ConfigureResource(resource => resource.AddService(DiagnosticsConfig.Name))
    .WithMetrics(metrics =>
    {
        metrics
            .AddAspNetCoreInstrumentation()
            .AddHttpClientInstrumentation();

        metrics.AddMeter(DiagnosticsConfig.Meter.Name);
        metrics.AddOtlpExporter();
    })
    .WithTracing(tracing =>
    {
        tracing
            .AddAspNetCoreInstrumentation()
            .AddHttpClientInstrumentation()
            .AddEntityFrameworkCoreInstrumentation();

        tracing.AddOtlpExporter();
    })
    .WithLogging(logging => logging.AddOtlpExporter());
By default, OpenTelemetry doesn’t track every Meter you define in your app. You need to explicitly register the ones you want to observe. In this case, DiagnosticsConfig.Meter.Name is “Notes”.
2. Define your custom metrics
In a separate class (e.g., DiagnosticsConfig.cs), define your custom meters:
				public static class DiagnosticsConfig
{
    public const string Name = "Notes";

    public static Meter Meter = new(Name);

    public static Counter<int> NotesCounter = Meter.CreateCounter<int>("notes.count");
    public static Counter<int> NotesDescriptionTooLong = Meter.CreateCounter<int>("notes.description.too_long");
}
Each counter can be used to track specific business events, like the number of notes created or validation errors.
3. Use the metrics in your endpoints
Now just plug them into your API logic, for example, adding on your endpoint:
				DiagnosticsConfig
    .NotesDescriptionTooLong
            .Add(1,
                new KeyValuePair<string, object?>("note.description", request.Description),
                new KeyValuePair<string, object?>("note.description.length", request.Description.Length));

//And
 DiagnosticsConfig.NotesCounter.Add(1, new KeyValuePair<string, object?>("note.id", note.Id));
You’re free to pass as many KeyValuePair<string, object?> as needed. These are extremely useful for filtering and grouping metrics later in the Dashboard.
				app.MapPost("notes", async (
    [FromBody] CreateNoteRequest request,
    AppDbContext context,
    ILogger<Program> logger,
    CancellationToken ct) =>
{
    if (request.Description.Length > CNotesLength.description)
    {
        logger.LogWarning("Invalid description length -> {Description} - {length}", request.Description, request.Description.Length);

        DiagnosticsConfig
            .NotesDescriptionTooLong
                .Add(
                    1,
                    new KeyValuePair<string, object?>("note.description", request.Description),
                    new KeyValuePair<string, object?>("note.description.length", request.Description.Length));

        return Results.BadRequest();
    }

    var note = new Note()
    {
        Description = request.Description,
    };

    await context.AddAsync(note);
    await context.SaveChangesAsync(ct);

    DiagnosticsConfig.NotesCounter.Add(1, new KeyValuePair<string, object?>("note.id", note.Id));

    logger.LogInformation("Note created with ID -> {Id}", note.Id);

    return Results.Ok(note);
});
With these counters, you’ll be able to visualize and filter metrics in the Aspire Dashboard or any backend supporting OTLP (like Prometheus, Grafana, or Azure Monitor).
Visualizing Custom Metrics in the .NET Aspire Dashboard
Once your custom metrics are up and running, the next step is seeing them come to life. The .NET Aspire Dashboard provides a beautiful UI to explore your data in real time.
1. Run the Aspire Dashboard with Docker (in seconds)
				services:
  notes.api:
    image: ${DOCKER_REGISTRY-}notesapi
    container_name: notes.api
    build:
      context: .
      dockerfile: Notes.API\Dockerfile
    ports:
      - "5000:5000"
      - "5001:5001"
    environment:
      - OTEL_EXPORTER_OTLP_ENDPOINT=http://notes.dashboard:18889
    networks:
      - otel

  notes.dashboard:
    image: mcr.microsoft.com/dotnet/aspire-dashboard:latest
    container_name: notes.dashboard
    ports:
      - 18888:18888
    networks:
      - otel

  notes.database:
    image: postgres:latest
    container_name: notes.database
    environment:
      - OTEL_EXPORTER_OTLP_ENDPOINT=http://notes.dashboard:18889
      - POSTGRES_USER=postgres
      - POSTGRES_PASSWORD=postgres
      - POSTGRES_DB=NotesDb
    volumes:
      - notes-data:/var/lib/postgresql/data
    ports:
      - 5432:5432
    networks:
      - otel

networks:
  otel:

volumes:
  notes-data:
After a few seconds, access http://localhost:18888 and your app’s metrics will start showing up automatically if it’s running and sending OTLP data.
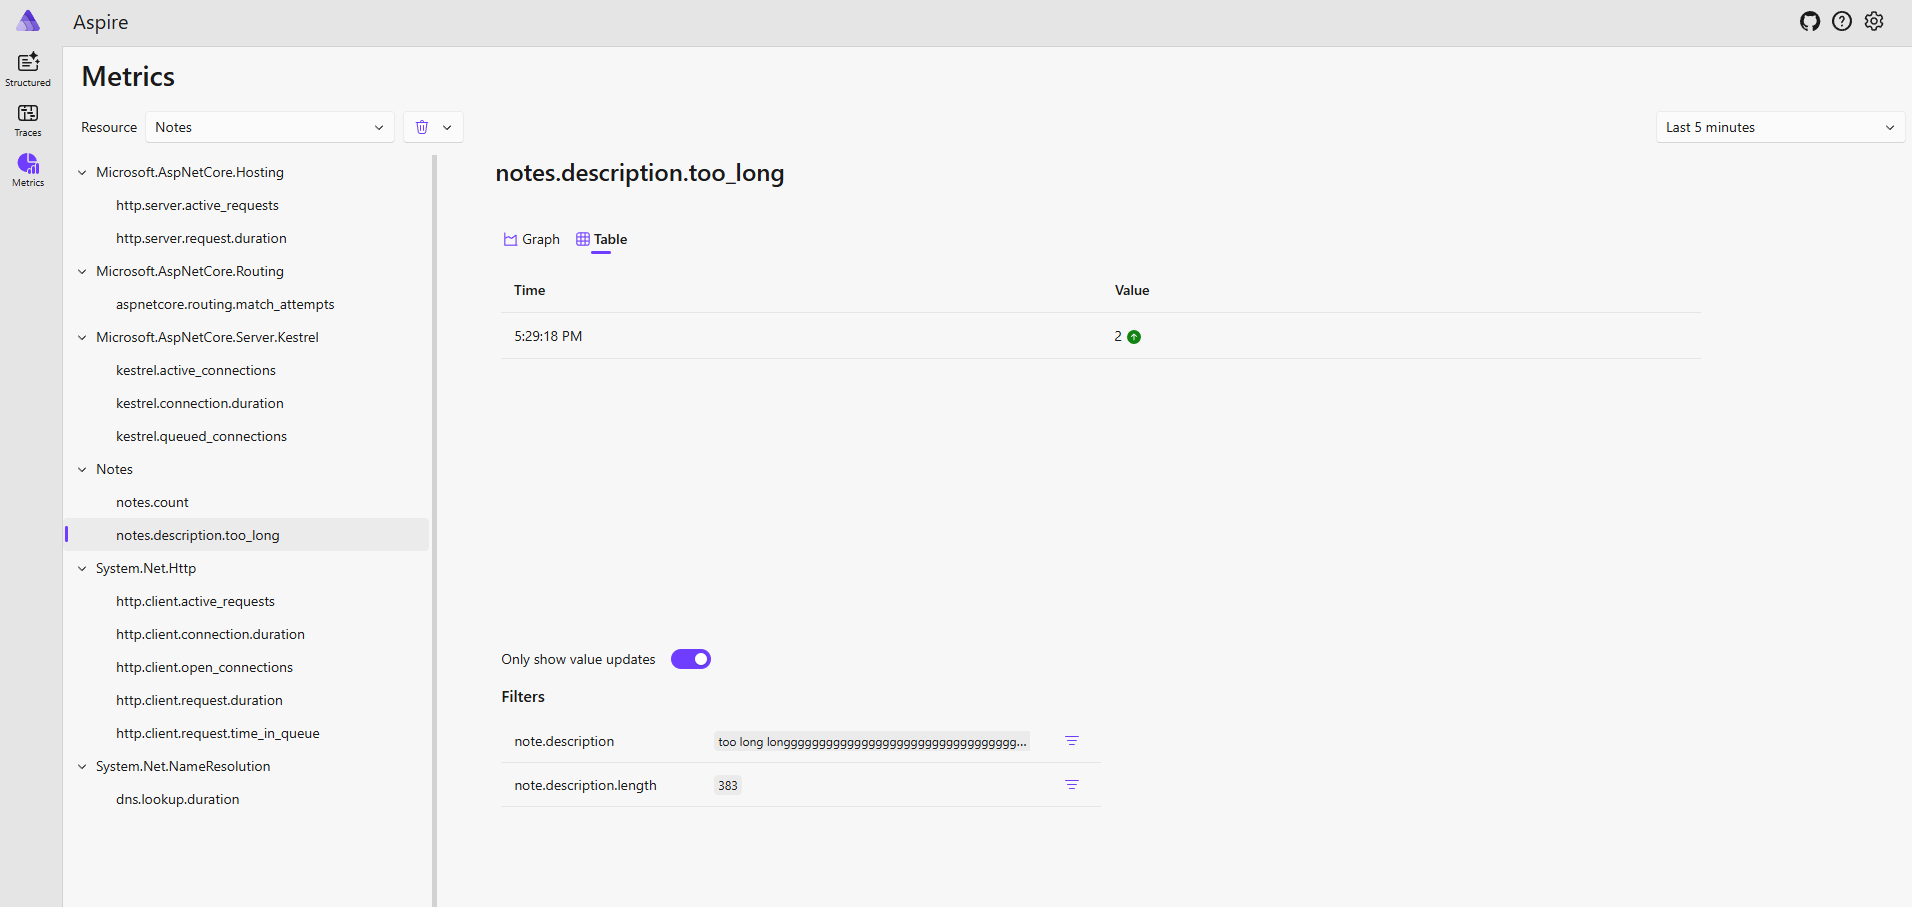
2. See Your Custom Metrics in Action
Once connected, you can open the “Metrics” tab and look for the counters you defined.
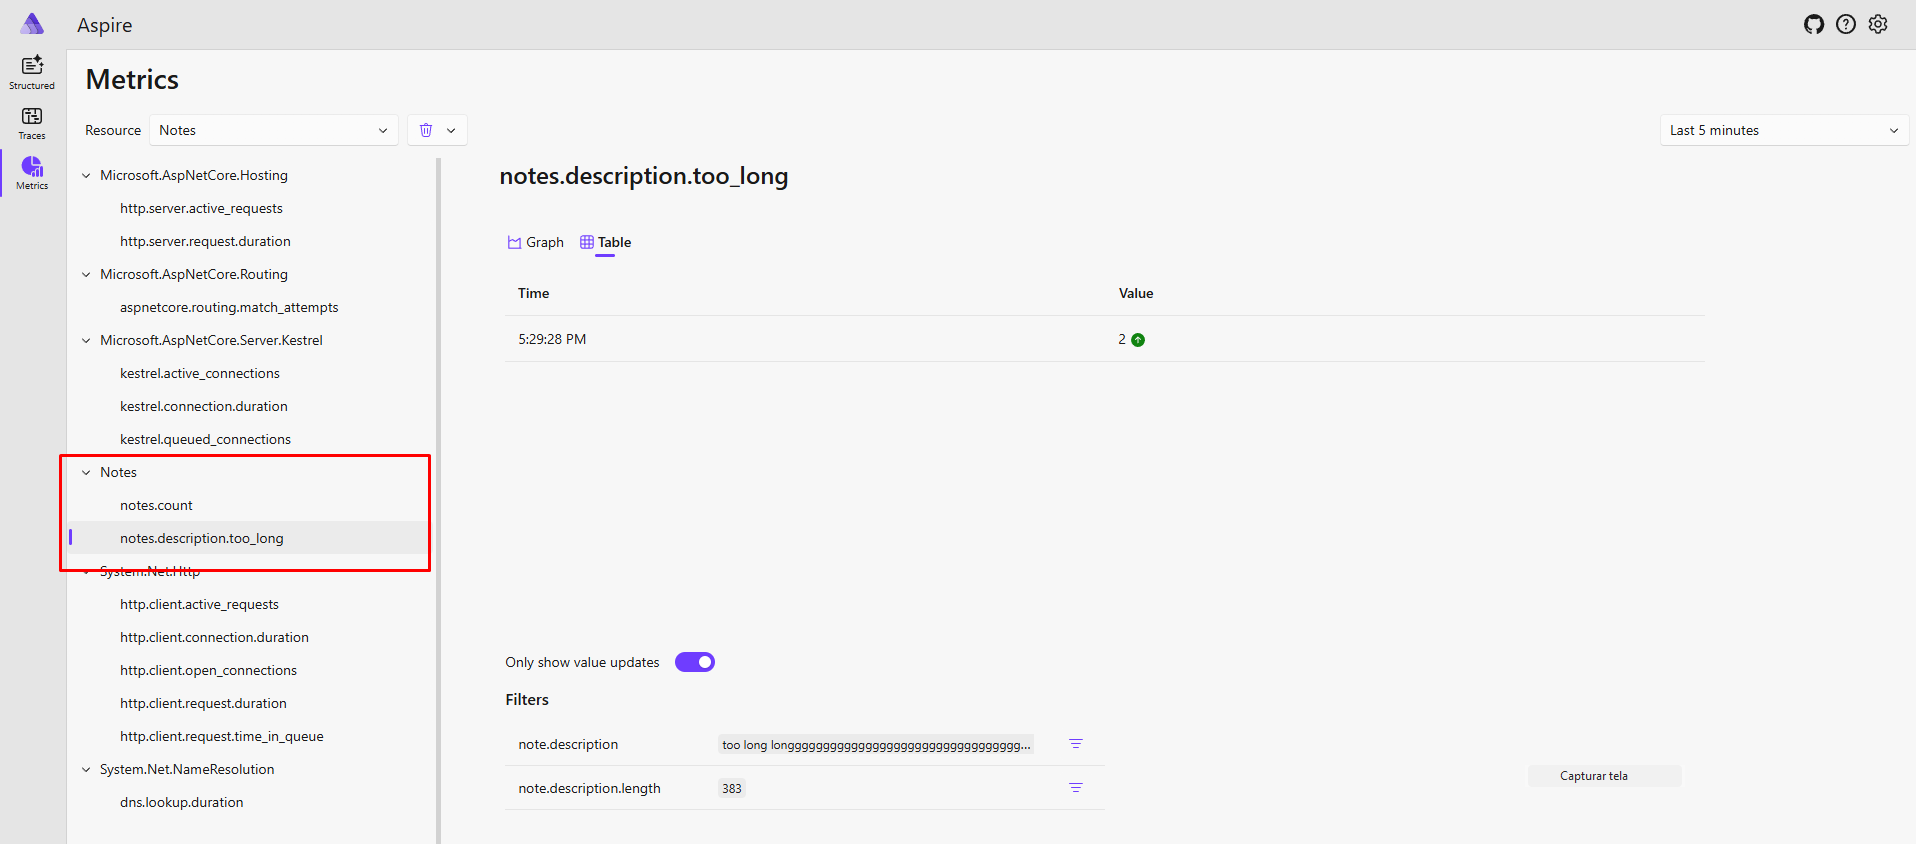
Example 1 – Too Long Description
Below, we can see how many times users tried to create a note with an invalid description length:
Example 2 – Notes Created
And here’s a chart showing how many notes have been successfully created over time:
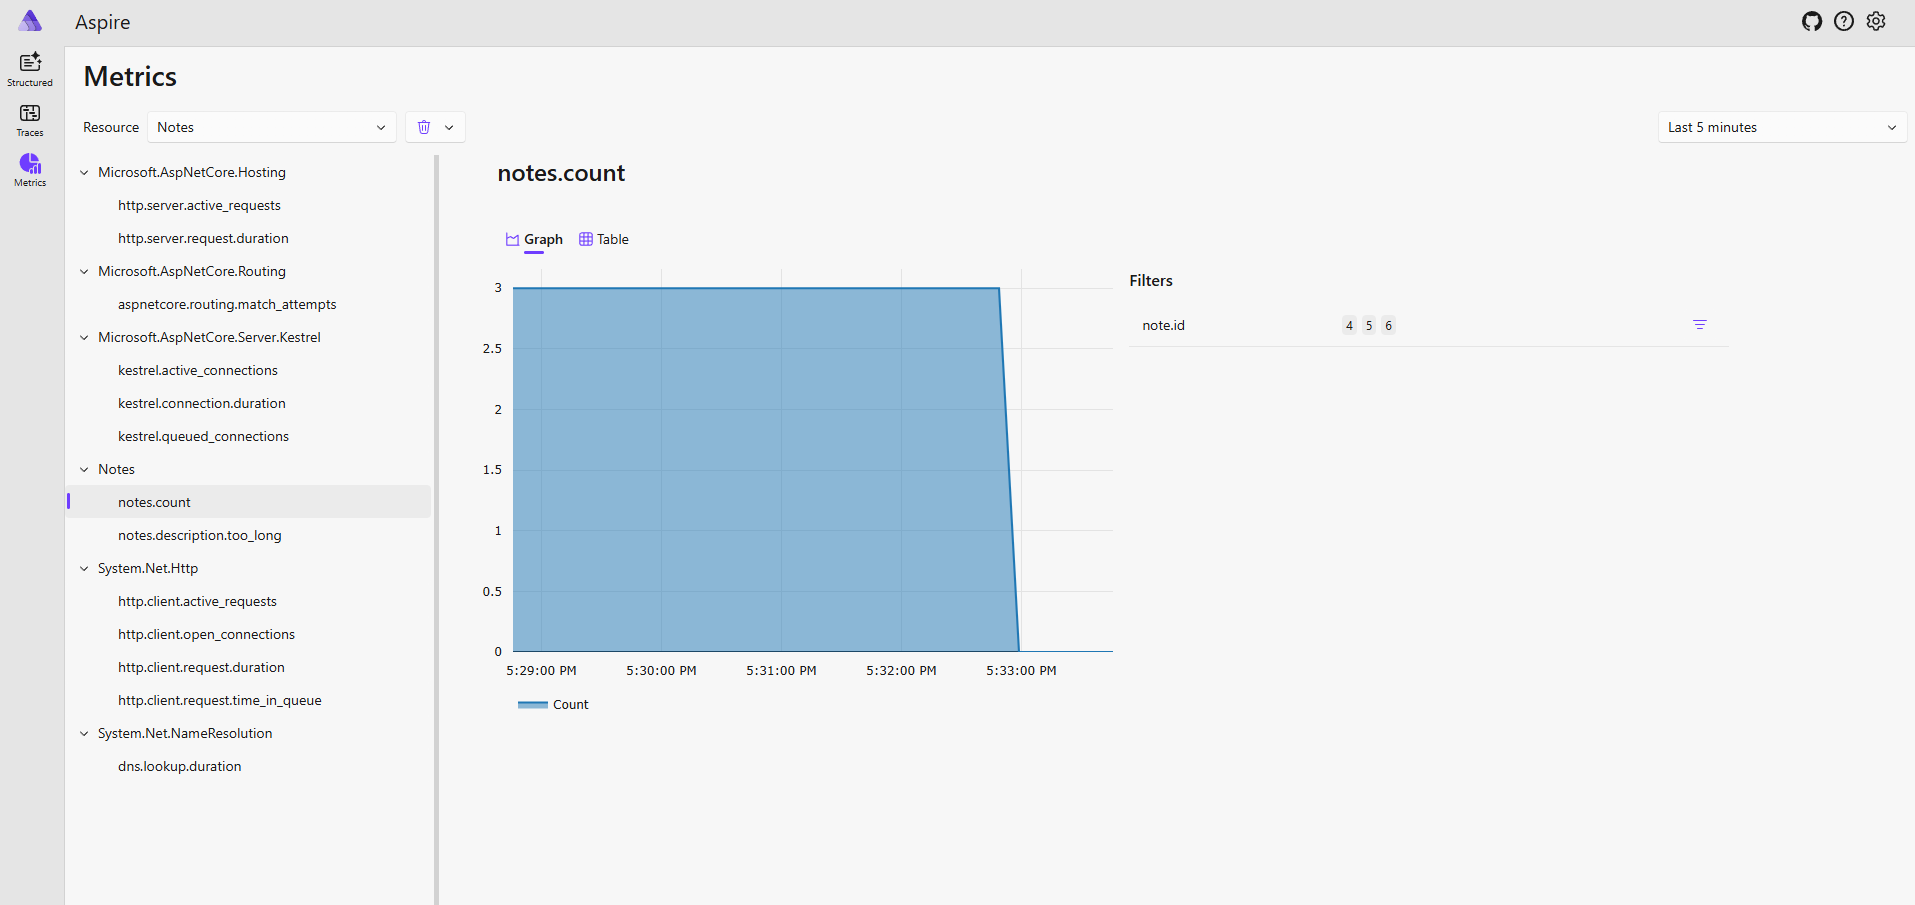
You can filter metrics by name, tags (like note.id or note.description.length), and even build dashboards around them. Metrics are updated in real time, You’re not just tracking performance, you’re tracking business value, notes.count tells you how much your feature is being used. It’s a direct signal of user interaction.
Conclusion
In this guide, we’ve explored how to create custom metrics in a .NET application using OpenTelemetry and visualize them with the .NET Aspire Dashboard. By defining meaningful counters and enriching them with key-value tags, you can gain real-time insights into how your application behaves and how users interact with it.
With just a few lines of code and a simple Docker command, you can bring observability into your local development flow—making it easier to debug issues, monitor features, and improve the quality of your system.
You can check out the full code and implementation in my GitHub repository:
Observability .NET with OpenTelemetry
Thank you for reading.
See you next time!
Sponsors
- Check out this insightful book on building CLI applications with C# and .NET. A must-read for any developer looking to master the craft!